Atomic Structure and Elements

Explore atoms, mass numbers, electron arrangement, and classification of elements.

1.1.1 Structure of the Atom

All matter is made up of extremely tiny particles called atoms.

These atoms may exist:

  • Alone (as in noble gases)
  • Combined with other atoms to form molecules
  • Combined chemically to form compounds

Atoms are so small that millions of them can fit on the tip of a pin.


What is an Atom?

An atom is the smallest particle of an element that can participate in a chemical reaction while still retaining the properties of that element.

For example:

  • A gold atom still behaves like gold.
  • An oxygen atom still behaves like oxygen.

If the atom is broken down further, it loses the properties of that element.


Characteristics of Atoms

Atoms have several important characteristics:

  1. Atoms are extremely small and cannot be seen with the naked eye.
  2. Atoms retain their chemical properties even after reaction.
  3. Atoms combine with other atoms to form molecules or compounds.
  4. Atoms usually cannot be broken down by chemical reactions but can be split in nuclear reactions which release large amounts of energy.

Parts of an Atom

An atom has two main regions:

  1. The nucleus
  2. Electron energy levels (shells)

The nucleus is located at the centre, while electrons move around it.

Structure of an Atom Diagram

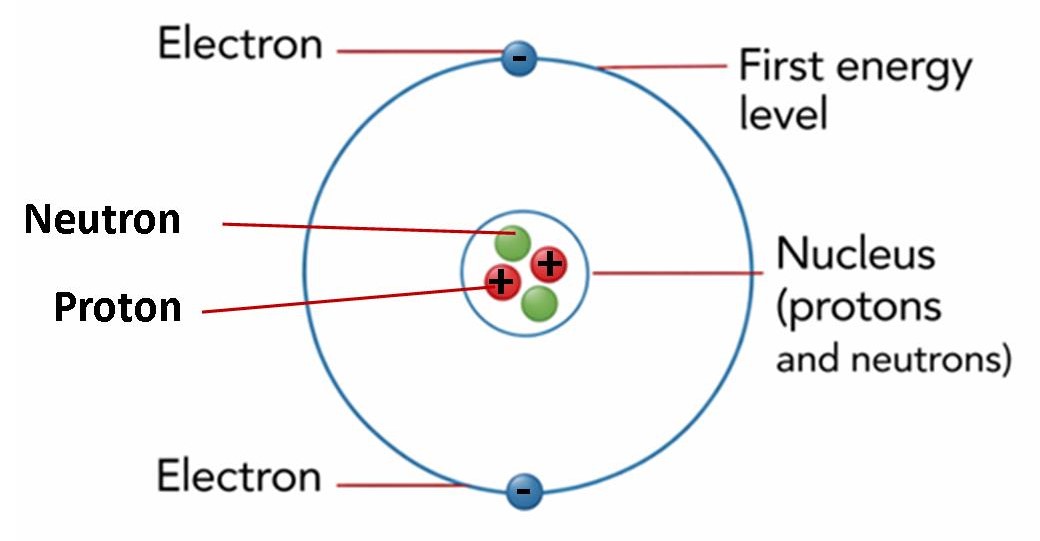
Figure: Structure of an Atom


The Nucleus

The nucleus is the central core of the atom. Although it is very small compared to the whole atom, it contains almost all the mass of the atom.

Characteristics of the Nucleus

  • It is extremely small.
  • It is very dense.
  • It contains most of the mass of the atom.
  • It is positively charged because of the presence of protons.

The nucleus holds the atom together.

Particles in the Nucleus

The nucleus contains two types of particles:

  1. Protons
  2. Neutrons

These particles are collectively called nucleons.


Electron Energy Levels (Shells)

Electrons move around the nucleus in regions called energy levels, electron shells, or orbitals.

These shells are arranged in layers around the nucleus.

Characteristics of Electron Shells

  • Electrons move around the nucleus in energy levels.
  • Each shell has a maximum number of electrons it can hold.
  • Shells nearer the nucleus have lower energy.
  • Shells further away from the nucleus have higher energy.

Electrons normally fill the lower energy levels first before moving to higher ones.


Sub-Atomic Particles

Atoms are made up of three main sub-atomic particles.

Particle Symbol Charge Location
Proton p +1 Nucleus
Neutron n 0 (neutral) Nucleus
Electron e −1 Energy levels

Each particle has a different role and function in the atom.


Protons

Protons are positively charged particles found in the nucleus.

Characteristics of Protons

  • Carry a positive charge (+1).
  • Located in the nucleus.
  • Determine the atomic number of an element.
  • Determine the identity of the element.

Examples:

  • Hydrogen has 1 proton
  • Carbon has 6 protons
  • Oxygen has 8 protons

Changing the number of protons changes the element itself.


Neutrons

Neutrons are neutral particles found in the nucleus.

Characteristics of Neutrons

  • Have no electrical charge.
  • Found in the nucleus.
  • Help increase the mass of the atom.
  • Help stabilize the nucleus.

Electrons

Electrons are negatively charged particles that move around the nucleus.

Characteristics of Electrons

  • Carry a negative charge (-1).
  • Move around the nucleus in energy levels or shells.
  • Have very small mass compared to protons and neutrons.
  • Participate in chemical reactions and bonding.

When atoms react chemically, it is the electrons that are gained, lost or shared.


Important Relationship in Atoms

In a neutral atom, the number of positive charges must equal the number of negative charges.

Therefore:

Number of protons = Number of electrons

Example

Element Protons Electrons
Hydrogen 1 1
Carbon 6 6
Oxygen 8 8

Because the charges cancel each other, the atom has no overall charge.

This is why atoms are electrically neutral.

Watch: Structure of the Atom Explained

Video: Understanding the Structure of the Atom

1.1.2 The Mass Number of Elements

Every element is made of atoms. Although atoms are extremely small, scientists can describe them using important numerical values.

Two of the most important numbers used to identify atoms are:

  1. Atomic number
  2. Mass number

These numbers help scientists understand the structure of atoms, determine the type of element, and calculate the number of particles in the atom.


Atomic Number

The atomic number is the number of protons in the nucleus of an atom.

It is represented by the symbol: Z

Relationship Between Atomic Number, Protons and Electrons

In a neutral atom:

Atomic number = Number of protons = Number of electrons

This happens because:

  • Protons carry positive charge (+1)
  • Electrons carry negative charge (−1)

When the numbers are equal, the charges cancel out, making the atom electrically neutral.

Examples of Atomic Numbers

Element Number of Protons Atomic Number
Hydrogen 1 1
Carbon 6 6
Nitrogen 7 7
Sodium 11 11
Aluminium 13 13

For example:

  • Carbon always has 6 protons
  • Oxygen always has 8 protons

If the number of protons changes, the atom becomes a different element.


Mass Number

The mass number is the total number of protons and neutrons in the nucleus of an atom.

It is represented by the symbol: A

Mass number helps determine the total mass of the nucleus because protons and neutrons account for almost all the mass of the atom.

Formula for Mass Number

Mass number = Number of protons + Number of neutrons

Electrons are not included because their mass is extremely small compared to protons and neutrons.

Examples of Mass Numbers

Element Protons Neutrons Mass Number
Lithium 3 4 7
Nitrogen 7 7 14
Aluminium 13 14 27
Sodium 11 12 23

Example Explanation

For aluminium:

Protons = 13
Neutrons = 14

Mass number = Number of protons + Number of neutrons

Mass Number = 13 + 14 = 27

Therefore, the mass number of aluminium is 27.

Finding the Number of Neutrons

Sometimes the number of neutrons is not given directly. It can be calculated using the formula:

Neutrons = Mass number − Atomic number

Example Calculation

For sodium (Na):

Mass number = 23
Atomic number = 11

Neutrons = Mass number − Atomic number

Neutrons = 23 − 11 = 12

Therefore, the number of neutrons in sodium is 12.


Another Example

For nitrogen (N):

Mass number = 14
Atomic number = 7

Neutrons = Mass number − Atomic number

Neutrons = 14 − 7 = 7

Therefore, the number of neutrons in nitrogen is 7.

Writing Atomic and Mass Numbers

The atomic number and mass number are usually written beside the chemical symbol of an element.

They are written as:

  • Mass number at the top left
  • Atomic number at the bottom left

Example for Lithium:

⁷₃Li

Where:

  • 7 = Mass number
  • 3 = Atomic number
  • Li = Chemical symbol

More Examples of Atomic Notation

Element Symbol Representation
Hydrogen¹₁H
Helium⁴₂He
Carbon¹²₆C
Nitrogen¹⁴₇N
Oxygen¹⁶₈O
Sodium²³₁₁Na
Aluminium²⁷₁₃Al

Isotopes

Atoms of the same element can sometimes have different mass numbers. These atoms are called isotopes.

Definition of Isotopes

Isotopes are atoms of the same element that have the same atomic number but different mass numbers.

This means they have:

  • The same number of protons
  • The same number of electrons
  • Different numbers of neutrons

Example: Carbon Isotopes

Isotope Protons Neutrons Mass Number
Carbon-12 6 6 12
Carbon-13 6 7 13
Carbon-14 6 8 14

All these atoms are carbon because they have 6 protons, but they have different numbers of neutrons.


Importance of Atomic and Mass Numbers

These numbers help scientists to:

  • Identify elements
  • Calculate the number of sub-atomic particles
  • Understand atomic structure
  • Study chemical reactions
  • Classify elements in the periodic table

Want the full lesson? Subscribe to Premium to continue with complete notes on Electron Arragement, Metals and Non Metals, watch supporting video lessons, read quick summaries, attempt auto-marked questions, and practise with KJSEA-style exam questions. Also Access all Premium Content and Exams for all Subjects with a Single Premium Subscription.

Subscribe to Premium Back to Science Grade 9 Menu

Cleaning Household Facilities at Household Level

Household facilities should be cleaned regularly to maintain hygiene, safety, and comfort in the home.

Clean waste bins, sinks, and drainage areas help prevent bad smell, pests, and the spread of disease.

Correct cleaning promotes health and improves the home environment.

The lesson explains the meaning of household facilities and gives common examples found at home.

  • Waste bins and dustbins
  • Sinks and drainage structures
  • Open drains and surrounding areas

Learners also study materials, tools, and safety items required before cleaning begins.

Cleaning begins with preparation of tools, wearing protective items, and removing visible dirt and waste.

This is followed by washing, scrubbing, rinsing, disinfecting where necessary, and proper drying.

Safe handling of dirty water and cleaning agents is emphasized throughout the lesson.

  • Steps for cleaning a waste bin
  • Procedure for cleaning a sink
  • Guidelines for cleaning an open drain

Learners are guided on why each step matters and how good cleaning habits prevent health risks.

The lesson also links hygiene practices to responsibility at household level.

Important safety precautions are highlighted to protect the cleaner and other members of the household.

  • Using gloves correctly
  • Washing hands after cleaning
  • Keeping tools clean and dry

Learners then revise the topic using simplified summaries and guided review points.

The complete premium section includes structured notes, supporting video lessons, and quick revision summaries.

It also includes auto-marked practice activities and KCSE-style questions for revision and exam preparation.

Worked guidance and follow-up tasks are included in the full lesson.

Continuous practice helps learners understand cleaning procedures, hygiene rules, and household responsibility more clearly.

The remaining part of the lesson builds on these ideas with more guidance, examples, and revision support.

Want the full lesson? Subscribe to Premium Access to continue with complete notes on cleaning household facilities at household level, watch supporting video lessons, read quick summaries, attempt auto-marked questions, and practise with KCSE-style exam questions.

Cleaning Household Facilities at Household Level

Household facilities should be cleaned regularly to maintain hygiene, safety, and comfort in the home.

Clean waste bins, sinks, and drainage areas help prevent bad smell, pests, and the spread of disease.

Correct cleaning promotes health and improves the home environment.

The lesson explains the meaning of household facilities and gives common examples found at home.

  • Waste bins and dustbins
  • Sinks and drainage structures
  • Open drains and surrounding areas

Learners also study materials, tools, and safety items required before cleaning begins.

Cleaning begins with preparation of tools, wearing protective items, and removing visible dirt and waste.

This is followed by washing, scrubbing, rinsing, disinfecting where necessary, and proper drying.

Safe handling of dirty water and cleaning agents is emphasized throughout the lesson.

  • Steps for cleaning a waste bin
  • Procedure for cleaning a sink
  • Guidelines for cleaning an open drain

Learners are guided on why each step matters and how good cleaning habits prevent health risks.

The lesson also links hygiene practices to responsibility at household level.

Important safety precautions are highlighted to protect the cleaner and other members of the household.

  • Using gloves correctly
  • Washing hands after cleaning
  • Keeping tools clean and dry

Learners then revise the topic using simplified summaries and guided review points.

The complete premium section includes structured notes, supporting video lessons, and quick revision summaries.

It also includes auto-marked practice activities and KCSE-style questions for revision and exam preparation.

Worked guidance and follow-up tasks are included in the full lesson.

Continuous practice helps learners understand cleaning procedures, hygiene rules, and household responsibility more clearly.

The remaining part of the lesson builds on these ideas with more guidance, examples, and revision support.

Want the full lesson? Subscribe to Premium Access to continue with complete notes on cleaning household facilities at household level, watch supporting video lessons, read quick summaries, attempt auto-marked questions, and practise with KJSEA-style exam questions.

Cleaning Household Facilities at Household Level

Household facilities should be cleaned regularly to maintain hygiene, safety, and comfort in the home.

Clean waste bins, sinks, and drainage areas help prevent bad smell, pests, and the spread of disease.

Correct cleaning promotes health and improves the home environment.

The lesson explains the meaning of household facilities and gives common examples found at home.

  • Waste bins and dustbins
  • Sinks and drainage structures
  • Open drains and surrounding areas

Learners also study materials, tools, and safety items required before cleaning begins.

Cleaning begins with preparation of tools, wearing protective items, and removing visible dirt and waste.

This is followed by washing, scrubbing, rinsing, disinfecting where necessary, and proper drying.

Safe handling of dirty water and cleaning agents is emphasized throughout the lesson.

  • Steps for cleaning a waste bin
  • Procedure for cleaning a sink
  • Guidelines for cleaning an open drain

Learners are guided on why each step matters and how good cleaning habits prevent health risks.

The lesson also links hygiene practices to responsibility at household level.

Important safety precautions are highlighted to protect the cleaner and other members of the household.

  • Using gloves correctly
  • Washing hands after cleaning
  • Keeping tools clean and dry

Learners then revise the topic using simplified summaries and guided review points.

The complete premium section includes structured notes, supporting video lessons, and quick revision summaries.

It also includes auto-marked practice activities and KCSE-style questions for revision and exam preparation.

Worked guidance and follow-up tasks are included in the full lesson.

Continuous practice helps learners understand cleaning procedures, hygiene rules, and household responsibility more clearly.

The remaining part of the lesson builds on these ideas with more guidance, examples, and revision support.

Want the full lesson? Subscribe to Premium Access to continue with complete notes on cleaning household facilities at household level, watch supporting video lessons, read quick summaries, attempt auto-marked questions, and practise with KCSE-style exam questions.

Cleaning Household Facilities at Household Level

Household facilities should be cleaned regularly to maintain hygiene, safety, and comfort in the home.

Clean waste bins, sinks, and drainage areas help prevent bad smell, pests, and the spread of disease.

Correct cleaning promotes health and improves the home environment.

The lesson explains the meaning of household facilities and gives common examples found at home.

  • Waste bins and dustbins
  • Sinks and drainage structures
  • Open drains and surrounding areas

Learners also study materials, tools, and safety items required before cleaning begins.

Cleaning begins with preparation of tools, wearing protective items, and removing visible dirt and waste.

This is followed by washing, scrubbing, rinsing, disinfecting where necessary, and proper drying.

Safe handling of dirty water and cleaning agents is emphasized throughout the lesson.

  • Steps for cleaning a waste bin
  • Procedure for cleaning a sink
  • Guidelines for cleaning an open drain

Learners are guided on why each step matters and how good cleaning habits prevent health risks.

The lesson also links hygiene practices to responsibility at household level.

Important safety precautions are highlighted to protect the cleaner and other members of the household.

  • Using gloves correctly
  • Washing hands after cleaning
  • Keeping tools clean and dry

Learners then revise the topic using simplified summaries and guided review points.

The complete premium section includes structured notes, supporting video lessons, and quick revision summaries.

It also includes auto-marked practice activities and KCSE-style questions for revision and exam preparation.

Worked guidance and follow-up tasks are included in the full lesson.

Continuous practice helps learners understand cleaning procedures, hygiene rules, and household responsibility more clearly.

The remaining part of the lesson builds on these ideas with more guidance, examples, and revision support.

Subscribe to continue reading the full lesson.

Subscribe to Premium
"

Leave a Reply

Your email address will not be published. Required fields are marked *