Laboratory Apparatus, SI Units & Science Skills
Explore laboratory apparatus, science process skills, SI units, and practical activities. This page layout is structured for educational content and SEO, with sections ready for your coded content to be added later.
Those tiny 💡 bulbs are not just chilling there looking innocent 😏
Go on… tap them 👆
They’re hiding juicy science secrets 🧠✨
Don’t ignore them… they WILL judge you 😌
1.3.1 Basic Skills in Science
Basic skills in science are important because they help learners investigate, observe, measure, and communicate correctly during practical work. These skills make scientific learning more accurate and meaningful. 💡 Did you know? Science skills are also called process skills because they guide how learners carry out experiments and investigations step by step.
Manipulative Skill
Handling apparatus correctly.
Observation Skill
Using senses to gather information.
Measurement Skill
Measuring using correct units.
Classification Skill
Grouping items according to similarities.
Prediction Skill
Saying what may happen.
Communication Skill
Recording and sharing results.
Conclusion Skill
Giving a final answer based on results.
These skills help learners carry out investigations correctly and build confidence when working with scientific activities. 💡 Quick fact Accurate observation and measurement are especially important because they help learners record reliable results in experiments.
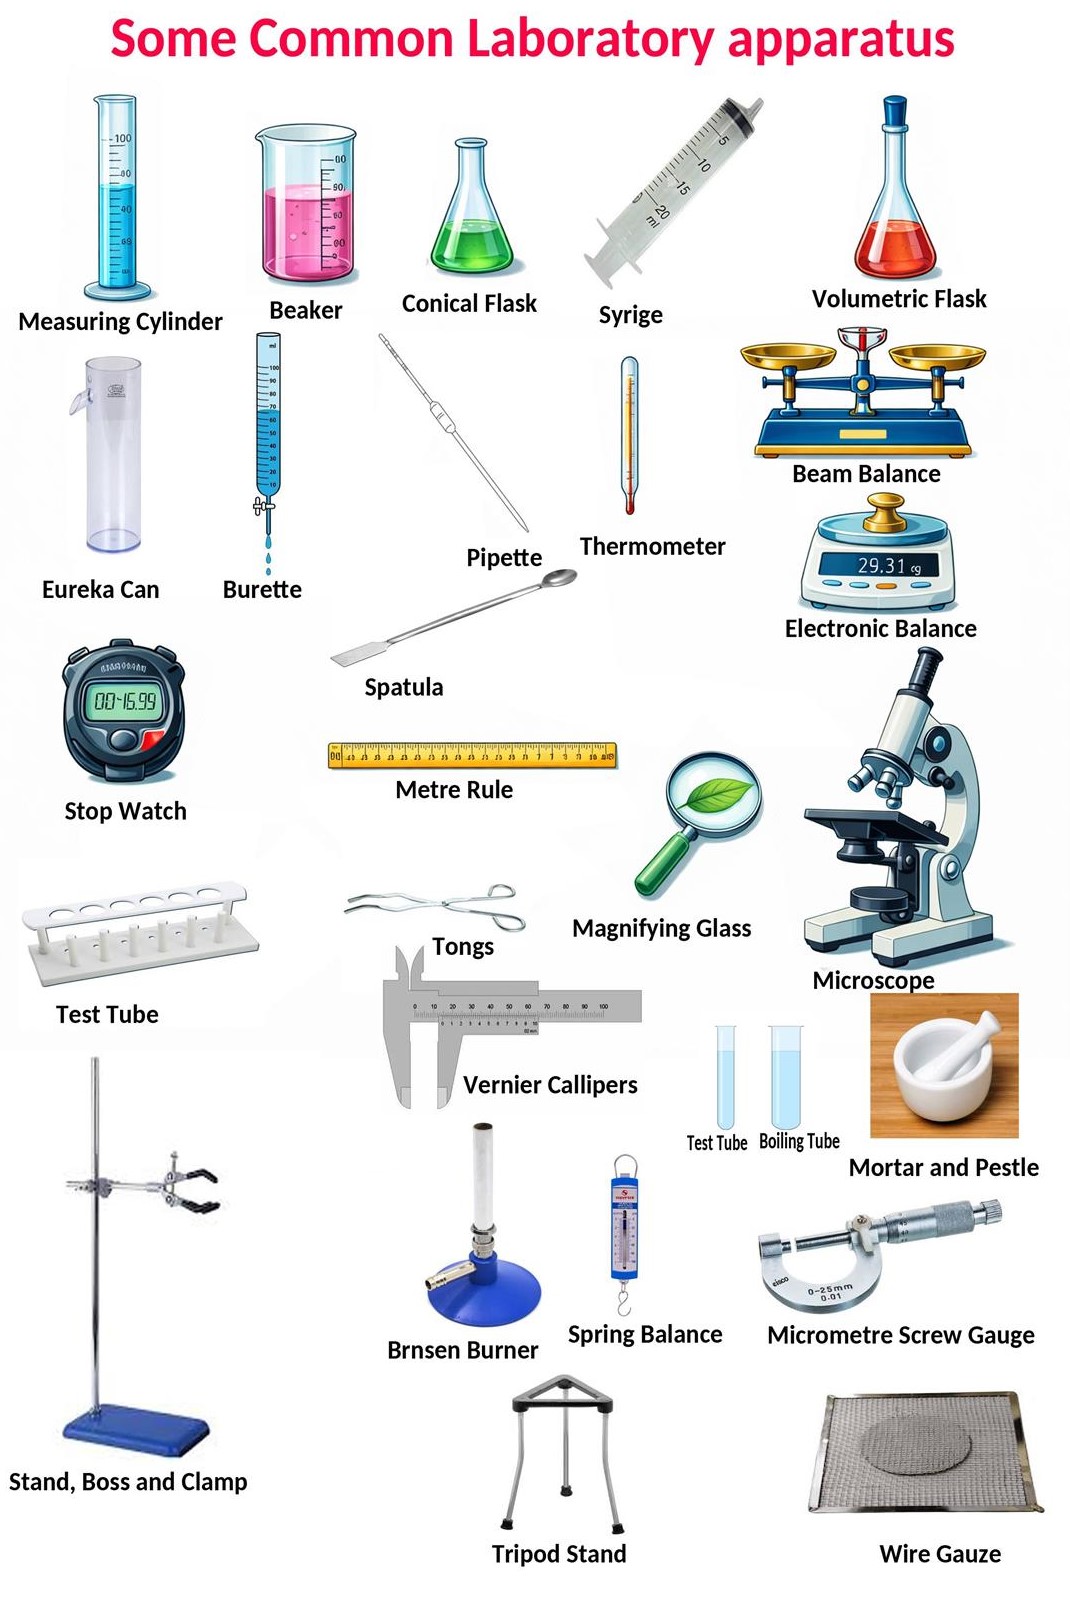
1.3.2 Uses and Care for Apparatus in the Laboratory
Laboratory apparatus are important tools used in science for measuring, heating, observing, and carrying out experiments correctly. Each apparatus has a special use, and proper care helps it remain safe, accurate, and durable. 💡 Did you know? Using the correct apparatus in an experiment helps learners get more accurate results and reduces the chance of mistakes.
1. Apparatus for Measuring Volume
Measuring cylinder – Measures liquid volume.
Beaker – Holds and mixes liquids (approximate measurement).
Conical flask – Used for mixing without spilling.
Pipette – Measures fixed small volumes accurately.
Burette – Measures liquid accurately (used in titration).
Volumetric flask – Prepares solutions of exact volume.
Syringe – Measures small liquid or gas volumes.
Eureka can – Measures volume of irregular solids.
2. Apparatus for Measuring Mass
Beam balance – Measures mass in grams (g).
Electronic balance – Digital measurement of mass.
3. Apparatus for Measuring Temperature
Thermometer – Measures temperature in degrees Celsius (°C).
4. Apparatus for Measuring Length
Ruler / Metre rule – Measures length in centimetres (cm) or metres (m).
Vernier calipers – Measures small lengths accurately.
Micrometer screw gauge – Measures very small objects like wires.
5. Apparatus for Measuring Time
Stopwatch – Measures time in seconds (s).
6. Apparatus for Measuring Weight
Spring balance – Measures weight in newtons (N).
7. Apparatus for Heating
Bunsen burner – Produces flame for heating.
Yellow flame – Safety flame.
Blue flame – Heating flame.
Tripod stand – Supports apparatus during heating.
Wire gauze – Spreads heat evenly.
8. Apparatus for Magnification
Hand lens – Magnifies small objects.
Light microscope – Magnifies very tiny objects.
These apparatus are used for different scientific purposes such as measuring, observing, and heating substances in the laboratory. 💡 Quick fact A beaker is useful in experiments, but it is not the best choice when very accurate volume measurement is needed.
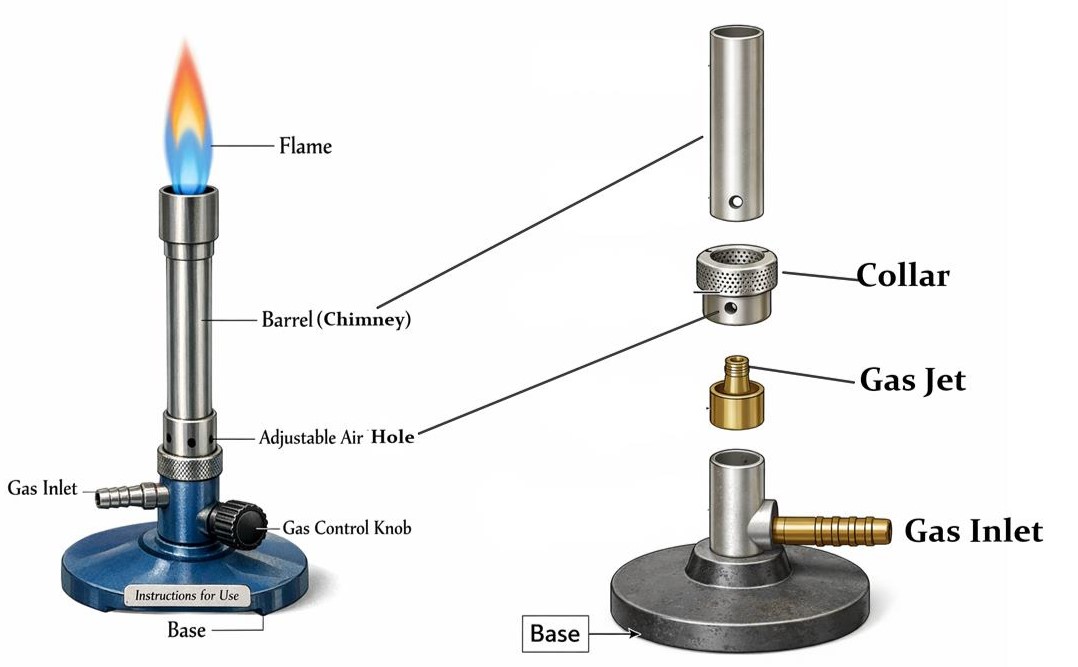
Parts of a Bunsen Burner
Base: Provides stability to ensure the burner remains upright and safe during use.
Barrel: Allows proper upward flow and mixing of gas and air to produce a steady flame.
Air hole: Regulates oxygen entry to control the temperature and quality of the flame.
Collar: Adjusts the size of the air opening to control flame intensity and combustion.
Gas inlet: Supplies and controls the flow of gas necessary for combustion.
Parts of a Light Microscope
Eyepiece: Magnifies the image formed by the objective lens so it can be clearly observed.
Objective lenses: Provide different levels of magnification to allow detailed viewing of specimens.
Stage: Supports and holds the specimen slide in position for observation.
Mirror / Light source: Provides and directs light through the specimen to make it visible.
Coarse adjustment knob: Moves the stage or body tube rapidly for rough focusing of the specimen.
Fine adjustment knob: Makes small, precise focus adjustments to produce a sharp and clear image.
Arm: Supports the upper parts of the microscope and is used for carrying it safely.
Base: Provides stability and supports the entire microscope.
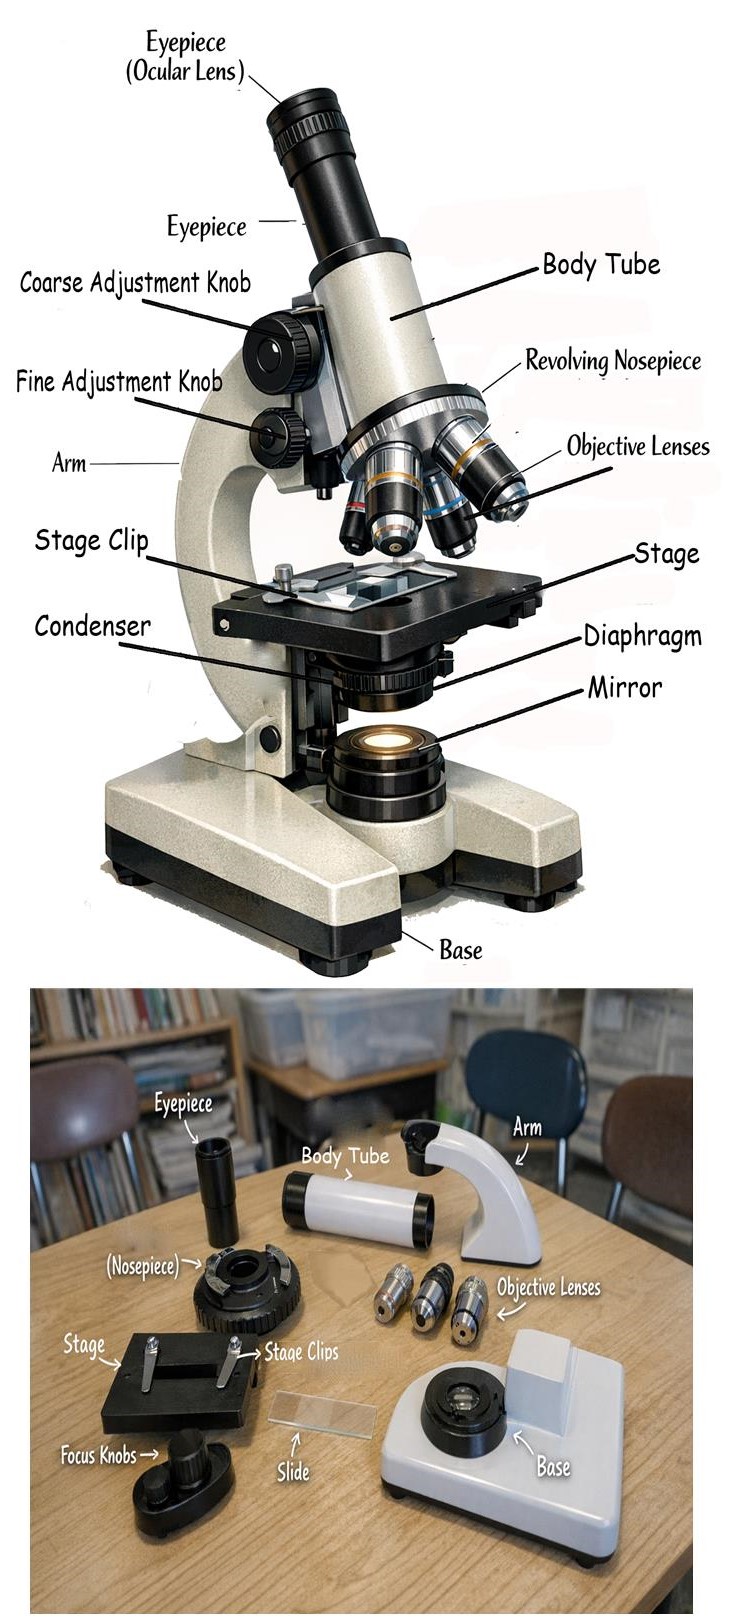
How to Carry and Care for a Light Microscope
How to Carry It
Use both hands.
One hand holds the arm.
The other hand supports the base.
How to Clean It
Use lens paper only.
Do NOT touch lenses with fingers.
Do NOT use tissue or cloth.
Before Storing
Rotate to low power objective.
Raise the body tube.
Clean lenses.
Cover with dust cover.
Store in a cool, dry place.
1.3.3 International System of Units (SI Units)
The International System of Units (SI Units) is the standard system used for measurement in science. It helps learners, teachers, and scientists use the same units everywhere for accuracy and consistency. 💡 Did you know? SI units are accepted internationally, which makes scientific communication easier across different countries and subjects.
Basic Quantities and Units
| Quantity (Full Name) | SI Base Unit | Symbol | Common Sub-units | Symbols | Conversions |
|---|---|---|---|---|---|
| Length (distance) | metre | m | kilometre, centimetre, millimetre | km, cm, mm |
1 km = 1000 m 1 m = 100 cm 1 m = 1000 mm |
| Mass (amount of matter) | kilogram | kg | gram, milligram, tonne | g, mg, t |
1 kg = 1000 g 1 g = 1000 mg 1 tonne = 1000 kg |
| Time (duration) | second | s | minute, hour, millisecond | min, h, ms |
1 min = 60 s 1 h = 3600 s 1 ms = 0.001 s |
| Electric current | ampere | A | milliampere, microampere | mA, µA |
1 mA = 0.001 A 1 µA = 0.000001 A |
| Thermodynamic temperature | kelvin | K | degree Celsius (relative) | °C |
°C = K − 273 0°C = 273 K |
| Amount of substance | mole | mol | millimole | mmol | 1 mol = 1000 mmol |
| Luminous intensity | candela | cd | millicandela | mcd | 1 cd = 1000 mcd |
Basic quantities are the main measurements from which many other measurements are derived. 💡 Quick fact Length, mass, and time are among the most commonly used basic quantities in school science.
Derived Quantities and Units
| Quantity (Full Name) | SI Unit | Symbol | Common Sub-units | Symbols | Conversions |
|---|---|---|---|---|---|
| Area (surface) | square metre | m² | square kilometre, square centimetre, square millimetre | km², cm², mm² |
1 km² = 1,000,000 m² 1 m² = 10,000 cm² 1 m² = 1,000,000 mm² |
| Volume (space) | cubic metre | m³ | litre, millilitre | L, mL |
1 m³ = 1000 L 1 L = 1000 mL |
| Speed (velocity) | metre per second | m/s | kilometre per hour | km/h |
1 m/s = 3.6 km/h 1 km/h = 0.2778 m/s |
| Density (mass per unit volume) | kilogram per cubic metre | kg/m³ | gram per cubic centimetre | g/cm³ |
1 kg/m³ = 0.001 g/cm³ 1 g/cm³ = 1000 kg/m³ |
Derived quantities are obtained from basic quantities through calculation. 💡 Did you know? Speed is derived from distance and time, while density is derived from mass and volume.
1.3.4 Practical Activities
Practical activities help learners understand science by performing experiments and using laboratory apparatus correctly. 💡 Did you know? Learners remember more when they perform experiments compared to just reading theory.
Experiment: Filtration
1. Aim of the Experiment
To separate an insoluble solid (sand) from a liquid (water) using the method of filtration.
2. Materials Used
- Filter paper
- Funnel
- Measuring cylinder
- Beaker
- Glass rod
- Sand
- Water
- Electronic balance
3. Procedure (Steps Followed)
- Measure 50 ml of water using a measuring cylinder.
- Measure 20 g of sand using an electronic balance.
- Mixed the sand and water in a beaker.
- Stirred the mixture using a glass rod to form a suspension.
- Folded the filter paper into a cone shape and placed it inside the funnel.
- Set up the filtration apparatus by placing the funnel in a beaker.
- Carefully poured the sand-water mixture into the funnel.
- Allowed the mixture to stand until filtration was complete.
4. Observations
Clear water passed through the filter paper into the beaker. Sand particles remained on the filter paper.
5. Results
The liquid that passed through the filter paper is called the filtrate. The solid that remained on the filter paper is called the residue.
6. Conclusion
Filtration is a method used to separate an insoluble solid from a liquid. In this experiment, sand (insoluble solid) was successfully separated from water through filtration.
7. Precautions
- Ensure the filter paper fits properly inside the funnel.
- Do not overfill the funnel while pouring the mixture.
- Pour the mixture slowly along a glass rod to avoid splashing.
- Make sure the apparatus is clean before use.
Activity 2: Reading a Measuring Cylinder
- Place on a flat surface.
- Read at eye level.
- Read lower meniscus.
- Avoid parallax error.
Experiment: How to Use a Pipette
1. Aim
To accurately measure and transfer a specific volume of liquid using a pipette.
2. Procedure (Steps to Follow)
- Pour distilled water into a beaker.
- Attach a pipette filler (or bulb) to the pipette.
- Squeeze the filler and gently release it to draw water into the pipette.
- Fill the pipette until the bottom of the meniscus reaches the calibration mark.
- Remove the pipette filler and quickly close the top of the pipette with your thumb.
- Transfer the pipette to the receiving container.
- Gently lift your thumb to allow the liquid to flow out slowly.
- Allow the pipette to drain completely (do not blow out unless it is a blow-out pipette).
3. Important Notes
- Always read the volume at eye level to avoid parallax error.
- The correct reading is taken at the bottom of the meniscus.
- Hold the pipette in a vertical position when measuring.
4. Care of a Pipette
- Handle carefully to prevent breakage.
- Wash thoroughly after use.
- Rinse with distilled water before and after use.
- Dry the pipette on a drying rack.
- Store safely in a pipette holder or rack.
Experiment: Using a Burette
1. Aim
To accurately measure and deliver a known volume of liquid using a burette.
2. Procedure (Steps to Follow)
- Place the retort stand on a flat and stable surface.
- Clamp the burette vertically onto the stand.
- Ensure the tap (stopcock) is closed.
- Fill the burette with water slightly above the zero mark using a funnel.
- Open the tap to allow some liquid to flow out until the lower meniscus is exactly at the zero mark. (This also removes air bubbles.)
- Place a measuring cylinder or conical flask under the burette.
- Open the tap gently to allow water to flow into the container.
- Close the tap when the required volume has been delivered.
- Read the final burette reading at eye level.
- Calculate the volume delivered:
Volume delivered = Final reading - Initial reading
3. Important Notes
- Always read the burette at eye level to avoid parallax error.
- Take readings at the bottom of the meniscus.
- Ensure there are no air bubbles in the burette tip before starting.
CARE OF A BURETTE
Experiment: Using a Volumetric Flask
1. Aim
To accurately measure and prepare a solution of a specific volume.
2. Procedure (Steps to Follow)
- Place the volumetric flask on a working table, ensuring it is not at the edge.
- Using a funnel, add water (or solution) into the flask.
- Fill carefully until the liquid reaches the calibration (marked) line.
- Read the lower meniscus at eye level to ensure accurate measurement.
- If preparing a solution, stopper the flask and gently invert it several times to mix thoroughly.
3. Important Notes
- Always place the flask on a flat, stable surface.
- Do not exceed the marked calibration line.
- Ensure the outside of the flask is dry before taking readings.
4. Care of a Volumetric Flask
- Clean thoroughly after use.
- Rinse with distilled water before storing.
- Dry on a rack upside down.
- Store in a cool, dry place.
- Handle carefully since glass is delicate and can easily break.
Experiment: Using a Spring Balance
1. Purpose
A spring balance is used to measure weight, which is the force exerted on an object due to gravity. Weight is usually measured in Newtons (N).
2. Steps for Using a Spring Balance
- Ensure the reading is at zero before use. (Adjust if necessary.)
- Hold or hang the spring balance vertically.
- Attach the object to the hook at the bottom.
- Allow the object to hang freely without touching anything.
- Read the measurement at eye level.
- Record the weight in Newtons (N).
3. Important Notes
- Keep the balance vertical for accurate readings.
- Make sure the object is not swinging when taking the reading.
- Always read the scale at eye level to avoid error.
4. Care of a Spring Balance
- Do not exceed the maximum weight limit indicated on the scale.
- Handle carefully to avoid damaging the spring.
- Do not drop the instrument.
- Store it in its case after use.
- Keep in a cool, dry place to prevent rusting.
Experiment: Using an Electronic Balance
1. Steps to Follow
- Place the balance on a flat, stable surface.
- Switch on the electronic balance.
- Press the zero (tare) button to set the reading to 0.00 g.
- Place the object (e.g., a beaker or solid substance) gently on the pan.
- Wait for the reading to stabilize.
- Record the mass displayed on the screen.
- Remove the object after measurement.
- Clean the pan if necessary and switch off the balance.
2. Important Notes
- Do not exceed the maximum mass limit indicated on the balance.
- Always zero (tare) the balance before measuring.
- If using a container, place it on the pan first and press tare before adding the substance.
- Avoid placing hot or wet objects directly on the pan.
3. Care of Mass Measuring Instruments
- Handle carefully to avoid damage.
- Clean using a soft, dry cloth.
- Do not spill chemicals on the balance.
- Keep away from water and moisture.
- Store properly in a safe, dry place.
Experiment: Measuring Temperature
1. Procedure (Steps to Follow)
- Pour water into a beaker.
- Set up the tripod stand, wire gauze, and Bunsen burner.
- Heat the water gently using the Bunsen burner.
- Place the thermometer in the water with the bulb fully immersed.
- Ensure the bulb does not touch the sides or bottom of the beaker.
- Record the temperature at regular time intervals (e.g., every 30 seconds).
- Do not expose the thermometer directly to the flame.
2. Important Notes
- Immerse the thermometer fully without touching the sides of the beaker.
- Make sure the thermometer bulb is clearly visible for accurate readings.
- Take readings at consistent time intervals to track changes accurately.
3. Care of a Thermometer
- Handle carefully since it is very delicate.
- Dry the thermometer after use.
- Store it upright in its protective casing to prevent damage.
Experiment: Using a Stopwatch
1. Steps for Using a Stopwatch
- Ensure the stopwatch is set to zero before starting.
- Press the start button when the activity begins.
- Press the stop button when the activity ends.
- Read and record the time taken.
- Reset the stopwatch to zero after recording.
2. Care of a Stopwatch
- Handle carefully to avoid damage.
- Do not drop the stopwatch.
- Keep away from water and moisture.
- Replace batteries when necessary (for digital stopwatches).
- Store in a cool, dry place after use.
Experiment: Using an Ammeter
1. Purpose
To measure electric current in a circuit. Current is measured in amperes (A).
2. Apparatus Needed
- Ammeter
- Connecting wires
- Power source (battery or power supply)
- Resistor or electrical component
3. Steps for Using an Ammeter
- Switch off the circuit before connecting the ammeter.
- Connect the ammeter in series with the component whose current is to be measured.
- Ensure the positive terminal (+) of the ammeter is connected to the positive side of the circuit, and the negative terminal (−) to the negative side.
- Switch on the circuit.
- Observe and record the current reading on the ammeter.
- Switch off the circuit after measurement.
4. Important Notes
- Never connect an ammeter in parallel; this can damage the instrument.
- Ensure the current does not exceed the maximum rating of the ammeter.
- Read the scale at eye level to avoid parallax error.
5. Care of an Ammeter
- Handle carefully; it is a delicate instrument.
- Store in a dry, safe place when not in use.
- Avoid exposing it to excessive current beyond its range.
- Clean terminals if necessary to ensure good contact.
These activities help learners develop practical skills and apply scientific knowledge. 💡 Quick fact Accuracy in experiments depends on correct use of apparatus and careful observation.
Area Calculations
RECTANGLES
The area of a rectangle is the product of the base length and its height.
Example: A rectangle whose length is 8 metres has an area of 32 square metres. Calculate the width.
Solution:
Let the width of the rectangle be x
Formula: A = l × w
32 = 8 × x (dividing both sides by 8)
x = 4 metres
SQUARES
A square is a special rectangle where all sides are equal.
Formula: A = side × side
Example: Calculate the area of the square drawn below.
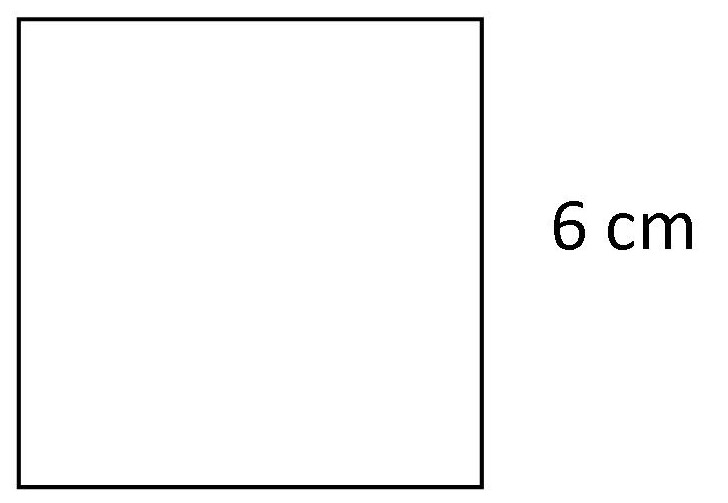
Solution:
Formula: A = s × s
A = 6 cm × 6 cm
Answer: A = 36 cm²
TRIANGLES
The area of a triangle is A = ½(base × height). The base and height always make an angle of 90°.
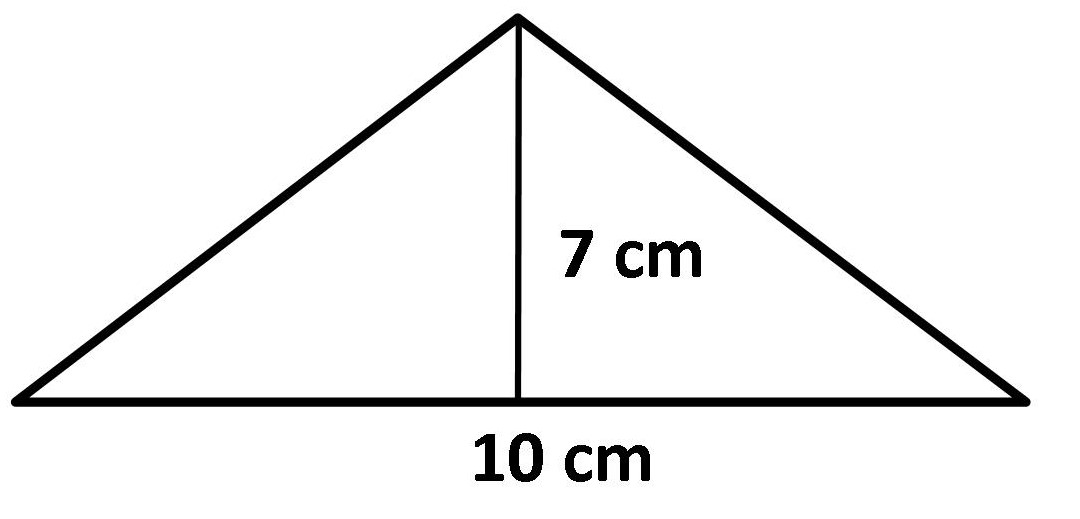
Example: Calculate the area of the triangle shown below.
Solution:
Formula: A = ½(base × height)
A = ½ (10 × 7)
Answer: A = 35 cm²
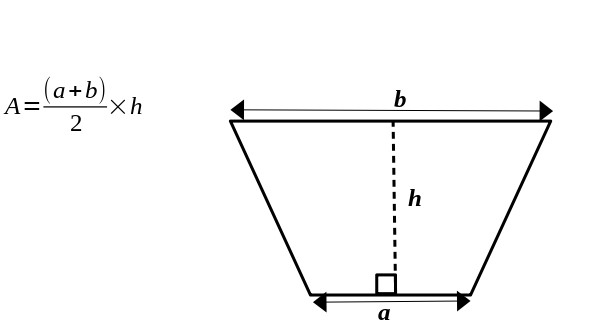
TRAPEZIUM
A trapezium is a four-sided figure in which two sides are parallel. The area of a trapezium is given by the formula:
Example:
Find the area of the trapezium shown below.
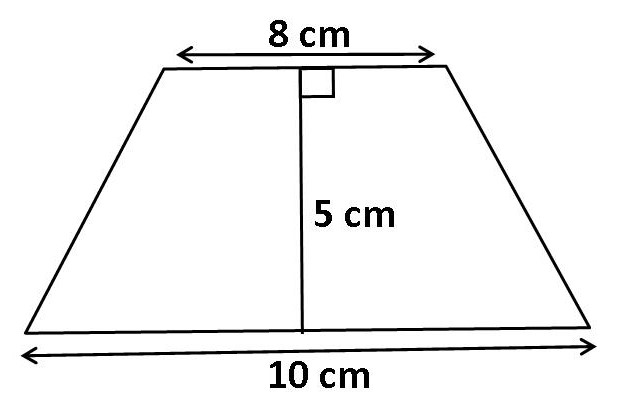
Solution:
The formula for the area of a trapezium is:
\[ A = \frac{(a + b)}{2} \times h \]
Where:
- a = 10 cm
- b = 8 cm
- h = 5 cm
Now, substituting the values:
\[ A = \frac{(10 + 8)}{2} \times 5 \]
\[ A = \frac{18}{2} \times 5 \]
\[ A = 9 \times 5 = 45 \, \text{cm}^2 \]
CIRCLES
The area of a circle is given by the formula:
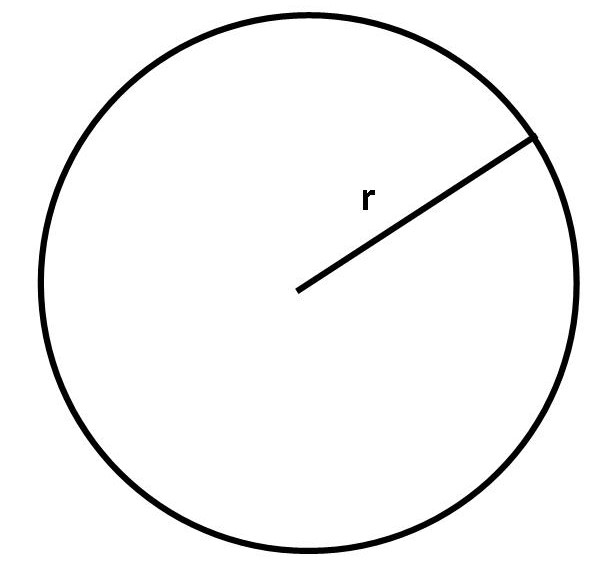
Formula: A = π × r² where r is the radius of the circle.
Example: A circle has a diameter of 70 m, calculate the area of the circle.
Solution: The diameter = 70 m, so the radius = 35 m.
Formula: A = π × r²
A = π × (35)²
Answer: A = 3,850 m²
AREA OF IRREGULAR OBJECTS
The steps are:
- Count Full Squares
- Count Partial Squares
- Find the area using the formula:
Formula: Area = ((Number of Full Squares) + (Partial Squares))/2
Example: Find the area of the figure below.
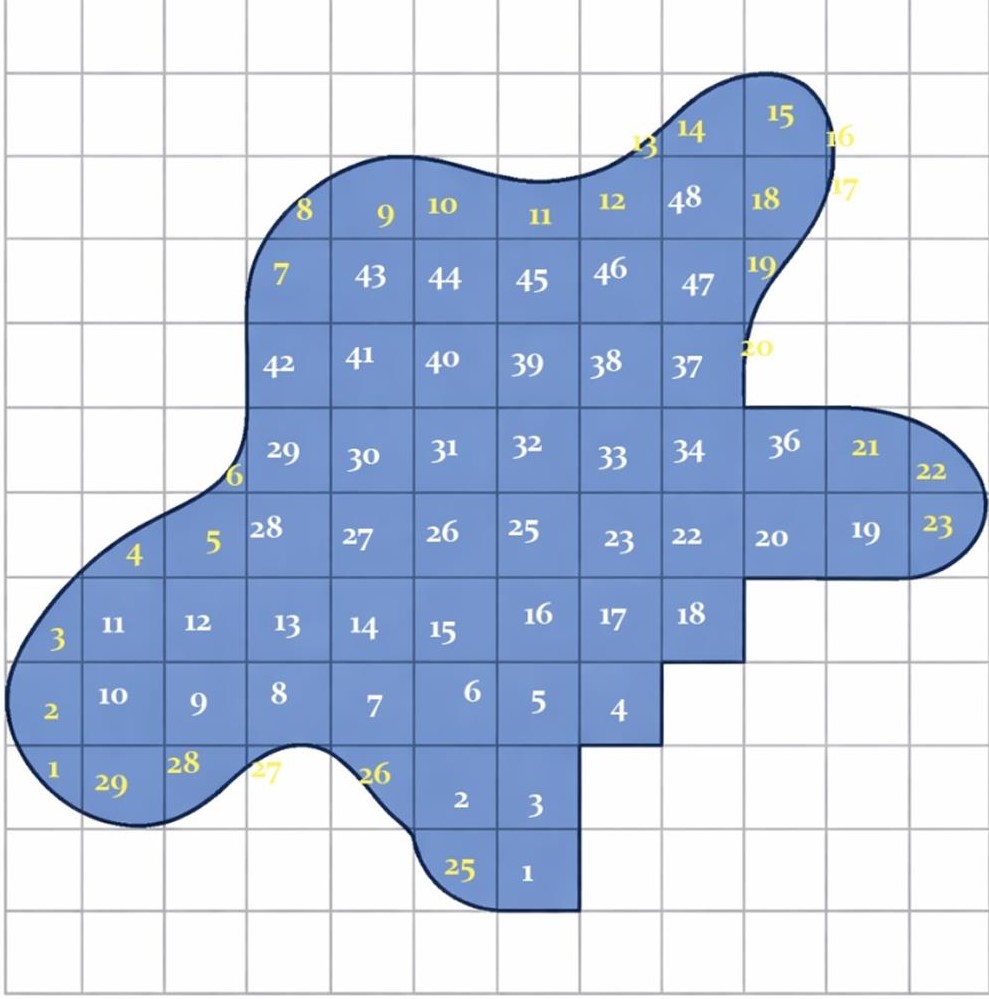
Solution:
The formula for calculating the area is:
\[ A = \text{no. of complete squares} + \frac{\text{no. of incomplete squares}}{2} \]
Where:
- Complete squares = 48
- Incomplete squares = 29
Now, substituting the values:
\[ A = 48 + \frac{29}{2} \]
\[ A = 48 + 14.5 \]
\[ A = 62.5 \, \text{sq units} \]
VOLUME OF REGULAR OBJECTS
The table below shows the formulae used in calculating volumes of cubes, cuboids, and cylinders.
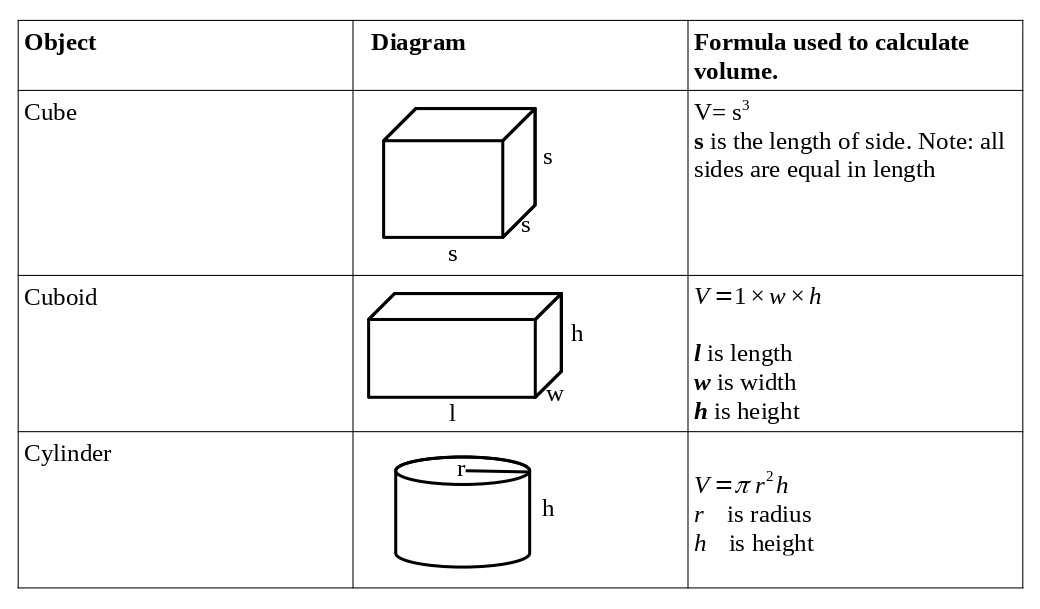
Example: Calculate the volume of a cube of side 5 cm.
Solution:
Volume of cube = s3
Volume = 5 cm × 5 cm × 5 cm = 125 cm3
Example: Calculate the volume of the cuboid measuring 140 cm by 30 cm by 70 cm in cubic meters.
Solution:
To get the answer in cubic meters, we convert all measurements to meters by dividing by 100:
Volume = (140/100) × (30/100) × (70/100) = 0.294 m3
Example: A cylindrical tank has a diameter of 140 cm and a height of 450 cm. Calculate the volume of the tank in cubic centimeters.
Solution:
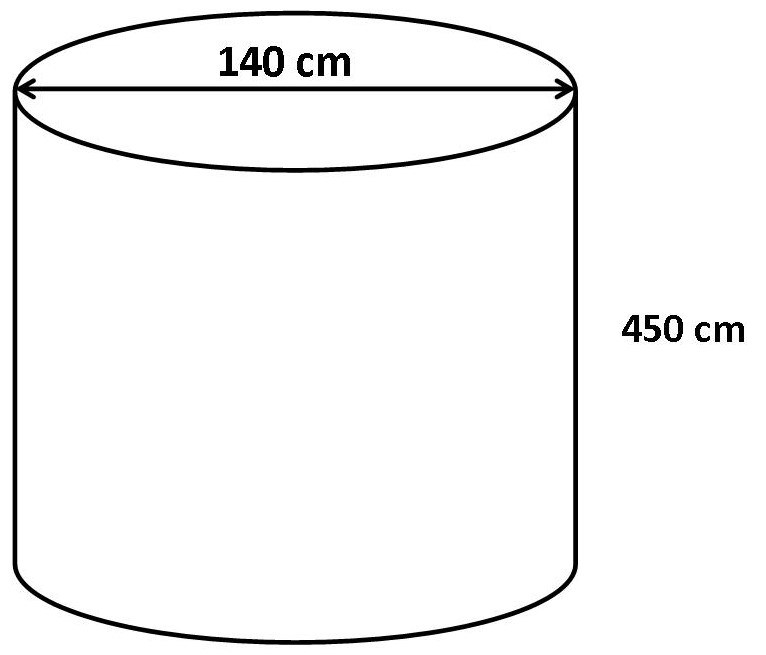
The diameter is 140 cm, therefore the radius is 70 cm.
Volume of cylinder = π × 702 × 450 = 6 930 000 cm3
Density
Definition
- Density is the mass of a substance per unit volume.
- It tells us how tightly matter is packed in a substance.
- It is a physical property of matter.
Formula:
The formula for density is:
Density (ρ) = Mass (m) / Volume (V)
SI Unit
The SI unit of density is kilogram per cubic meter (kg/m3).
Other common units include:
- grams per cubic centimeter (g/cm3)
- 1 g/cm3 = 1000 kg/m3
Rearranged Formulas
Sometimes, you can calculate mass or volume if density is known:
To calculate Mass, use:
Mass (m) = Density (ρ) × Volume (V)
To calculate Volume, use:
Volume (V) = Mass (m) / Density (ρ)
Example Calculations
Example 1: A substance has a mass of 200 g and a volume of 50 cm3. Find its density.
Solution:
Density = Mass / Volume = 200 g / 50 cm3 = 4.00 g/cm3
Example 2: A block of metal has a volume of 0.02 m3 and a density of 8000 kg/m3. Find its mass.
Solution:
Mass = Density × Volume = 8000 kg/m3 × 0.02 m3 = 160 kg
Determining Density of Irregular Objects Using Eureka Method
1. Principle
The Eureka method (also called the water displacement method) is based on Archimedes' principle: An object submerged in a fluid displaces a volume of fluid equal to its own volume. This method is used when the object does not have a regular shape, so its volume cannot be measured using a formula.
2. Apparatus
- Eureka can (overflow can)
- Measuring cylinder
- Thread or string
- Balance (to measure mass)
- Irregular object
3. Procedure
- Measure the mass of the object using a balance.
- Fill the Eureka can with water until it reaches the spout.
- Suspend the object using a thread and gently lower it into the Eureka can without touching the sides.
- Collect the displaced water in a measuring cylinder.
- Measure the volume of the displaced water. Volume of water displaced = volume of the object.
- Calculate the density using the formula: Density = Mass / Volume.
4. Example: An irregular rock has a mass of 300 g. When submerged in a Eureka can, it displaces 100 cm3 of water.
Solution:
Density = Mass / Volume = 300 g / 100 cm3 = 3.00 g/cm3
5. Key Points / Tips
- The object must be fully submerged.
- Avoid splashing to get an accurate volume measurement.
- Ensure the measuring cylinder measures displaced water accurately.
- This method works for solids that do not dissolve in water.
Speed
1. Definition
- Speed is the distance traveled by an object per unit time.
- It tells us how fast an object is moving, without considering direction.
- It is a scalar quantity (has magnitude only).
2. Formula:
The formula for speed is:
Speed (v) = Distance (d) / Time (t)
3. SI Unit
The SI unit of speed is meter per second (m/s).
Other common units include:
- Kilometers per hour (km/h) → 1 m/s = 3.6 km/h
- Centimeters per second (cm/s)
4. Rearranged Formulas
If speed, distance, or time is unknown, you can calculate it as:
To calculate Speed (v):
v = d / t
To calculate Distance (d):
d = v × t
To calculate Time (t):
t = d / v
5. Example Calculations
Example 1: A car travels 150 km in 3 hours. Find its speed.
Solution:
Speed = Distance / Time = 150 km / 3 hours = 50 km/h
Example 2: A cyclist travels at 5 m/s for 20 seconds. Find the distance covered.
Solution:
Distance = Speed × Time = 5 m/s × 20 s = 100 meters
6. Key Points
- Speed is a scalar (only magnitude, no direction).
- Make sure distance and time units are compatible before calculating.
Summary
Introduction
- Laboratory work involves the use of different apparatus and scientific skills.
- Accurate handling and observation improve experiment results.
- Science learning combines theory and practical activities.
Basic Skills in Science
- Manipulative skills involve handling apparatus correctly.
- Observation skills use senses to gather information.
- Measurement skills require correct units and tools.
- Classification groups items based on similarities.
- Prediction suggests possible outcomes.
- Communication records and shares results.
- Conclusion gives final answers based on findings.
Laboratory Apparatus
- Different apparatus are used for measuring volume, mass, temperature, length, and time.
- Each apparatus has a specific function in experiments.
- Correct use ensures accurate and reliable results.
Care of Apparatus
- Handle apparatus carefully to avoid damage.
- Clean equipment after use.
- Store apparatus properly in safe, dry places.
- Proper care increases durability and accuracy.
Bunsen Burner
- Used for heating substances in the laboratory.
- Has parts such as base, barrel, air hole, collar, and gas inlet.
- Produces yellow (safety) and blue (heating) flames.
Light Microscope
- Used to magnify very small objects.
- Main parts include eyepiece, objective lenses, stage, and adjustment knobs.
- Proper handling and cleaning ensure clear observation.
SI Units
- SI units are standard units used worldwide in science.
- Examples include metre (m), kilogram (kg), and second (s).
- They ensure consistency and accuracy in measurements.
Derived Quantities
- Derived quantities are obtained from basic quantities.
- Examples include area, volume, speed, and density.
- They involve calculations using standard units.
Importance of SI Units
- Ensure uniformity in scientific measurements.
- Help in accurate calculations and comparisons.
- Used globally in science, engineering, and industry.
Practical Activities
- Experiments help apply scientific knowledge.
- Develop skills such as measuring, observing, and recording.
- Improve understanding through hands-on experience.
Assessment
Laboratory Science Assessment
Answer all 20 questions on laboratory apparatus, science skills, SI units, and measurements.
Certificate of Achievement
This certifies that
has successfully completed the assessment on
Laboratory Science
Score: